Showing posts with label water marble. Show all posts

Thursday, November 22, 2012

Thanksgiving Watermarble Turkey!

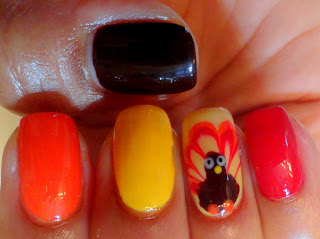
Happy Thanksgiving everyone!  I was happy with my previous mani, but I had to do something for Turkey Day!  I wanted to do a turkey, but I knew my skills still need some refining.  So I got the bright idea to use a watermarble for the tail feathers.

After 5 tries to get the marbling just right, my right hand actually came out better than my left: 

 Here's my left hand.  This turkey is a little plump, and his feathers are wonky!

Here's the right again:

And again:

I love this little guy!  I used Sinful Colors "Big Daddy" (orange) & "Pull Over" (yellow) and China Glaze "Red Satin" and "Call of the Wild".  I made the turkey with dotting tools.  

I'm so thankful for my family and friends, especially my husband and my 2 wonderful little boys.  I hope you take a moment today to think about what you're thankful for! 

Monday, November 12, 2012

Metallic Fall French & Marble

Lately I have really been struggling with the decision about what to do on my nails.  I have so many awesome un-trieds, and there are so many beautiful and creative designs out there, that I am sometimes overwhelmed. It's really not a big deal, except that between my 10-hour-per-day job and spending time with my 9 & 7 yo boys, my mani time is limited, so I want to get the most bang for my buck, so to speak.

So anyway, last night I prepped my nails, so they were based-coated and ready to go.  But I still couldn't make up my mind.  Finally, this morning I just picked some pretty autumn metallic colors, and did this:


I ended up using Sinful Colors "Mercury Rising", OPI DS Glow, OPI Take the Stage, and Klean Color "Metallic Yellow".  Water-marbling these glittery polishes is tricky, but I think it still came out pretty.  

Anyway, I'm kind of meh with this.  But it's shiny, it's autumn-ish, and I can wear it to work tomorrow, so it's all good! I think I need to just chill, and not get all worked up about coming up with some amazing design...after all, it's only nail polish!  :-)

Monday, October 15, 2012

Nail-Aween Challenge Day 4: Mummy Nails (Quick & Dirty Style)

I realized that today is October 15, and I've only completed 3 days of my 10-day challenge.  I was feeling the pressure, so I figured I'd do my mummy nails today.  Problem is that I can't wear them tomorrow for work, so I knew they were only for today.  This may have affected my desire to pay close attention to detail...

I saw THIS YouTube tutorial by Simple Little Pleasures for a mummy water marble, so it was right up my alley.  So I started with a base of China Glaze "Kalahari Kiss":
This is 2 lovely coats.

Then I did the water marble using Sinful Colors "Snow Me White" and "Nirvana" along with the CG "Kalahari Kiss".  Then added a black mask with my striper, and dotted on eyes (my son told me mummies have red eyes):

Meh.  There were lots of air bubbles, and my thumb really had issues!  I like the middle finger & thumb the best, though.  I think if I would have spent more time on the marble design, this could have been really cool so I'll have to try it again.  I just don't have the motivation for a do-over today, since I still have to do my nails again before work tomorrow :-/

Check out the other participants in this challenge:

Monday, October 1, 2012

Nail-aween Nail Art Challenge - Day 1: Water Marble

I LOVE Halloween!  When I found this challenge hosted by Sassy Nails, I couldn't resist, especially since this challenge is done at your own pace!  It's perfect for a full-time working mom of 2 young boyos, who also likes to read & knit & sew!


As you can see, today is Day 1, and I actually did a water marble!  Only bummer is that I can't wear it to work tomorrow since we've got an audit going, and I have some other professional-like things to do. Boo! 

I used all Sinful Colors for this one:
L to R: Clementine, Black on Black, Innocent, Amethyst

I painted on a coat of white (Sinful Colors "Snow Me White), and went to town:


I love the colors in this!  I wanted to use a darker green, but it wasn't working in the water marbling process...it wouldn't spread and it dried too fast :-(  My ring finger is just purple & green marble topped with my own little Halloween franken.  Overall, I'm happy with this one, except for the thumb, which I accidentally bumped :-/

These are the other cool peeps participating in the challenge.  Check 'em out!

Sunday, July 22, 2012

Fimo Flowers!

So after the glittery goodness that was Koi Pond, I was wanting a non-glitter mani next (i.e. I didn't want to go through the ordeal of removing glitter polish).  So I rummaged around my nail art box to see what I had not yet tried.

A while ago, I had found an awesome deal on fimo canes, so I had those sitting in there, and I had picked up a razor blade at the Dollar Tree around the same time, so I was set to go.  So I picked out some flower canes, and got some polish to match.

I did a water marble, sliced the canes, and stuck them on my nails with nail glue.


I think they came out pretty cute!  

They even matched the golf shirt I wore that day.  

Note to self:  fimo cane flower petals chip off whilst playing golf :-(

Monday, July 16, 2012

Water Marbling for Toes?

I was browsing around blog land, when I stumbled upon More Nail Polish!  OMG, she is so talented!  And super-creative/resourceful to boot.  Want thinking outside the box?  Look no further!  I mean, she figured out how to make her own cool magnets for magnetic polish!  Go check her out!  

And then, I saw THIS POST about "Dry Water Marbling"!  She reports that she is no good at water marbling, so she makes her marble design in the water, and then lifts it out of the water on a piece of Ziploc bag.  Once she does this, she is free to cut out the best pieces of the design, and apply them to her nails at will...no wasting tons of polish with each finger-dipping!  

Now, I'm no slouch at the whole water-marbling-the-old-fashioned-way, and I have gotten the whole process down pretty well, so it's really not a big deal to do it.  But I immediately saw the possibility of using this "Dry Water Marbling" for my toes!!  So exciting.

So, the first step is to make your water marble, then place a piece of Ziploc on top of it.  Then you can lift the whole she-bang out and set it down to dry.

I found that the stupid things wanted to curl onto themselves upon lifting out of the water, so be fore-warned.  That's why my lower purple-y one is all smudged in a bunch of places.  But when they dry, they behave nicely.

OK, so once they dry, the next step is to paint your nail with a base color.  Then, you are to cut out your design and apply polish-side down onto your base coat when it is "tacky", but not dry.  Press it down firmly. Okee-dokee!

At this point, you grab a corner firmly, then quickly rip off the plastic, like waxing your eyebrows.  I've definitely had practice doing that, so no problem...

Ahem.  Tacky base?  Check.  Firmly-pressed plastic?  Check.  Quick rip?  Check.  OK, let's try again...

Better, but still no cigar.  And now my other toes were dry at this point.  I applied a second base coat, waited about 5 minutes for it to dry, then tried applying my water marble again.

I am so bummed! :-(  I had such high hopes for this technique.  I think I'll try transferring the design to wax paper next time instead of the Ziploc...I dunno.  What do you think?  

Monday, June 25, 2012

Lacquistry Custom "Sand & Sea"

If you have followed my blog or FB page at all, you know that I absolutely adore Jenna @ Lacquistry!  She is a freakin' polish-making goddess, and is a total sweetheart to boot!  So, when I had the opportunity to request a custom order from her a while back, I jumped on the chance!  

I have already posted about one of my customs, "Hawaiian Sunset".  Next up is "Sand & Sea".  
Jenna says, "First up, you asked for something involving the beach and sand. I came up with something for you combining 9 different shapes, sizes and colors. We have the ocean represented by a "salty" cool oceanic blue (hey that rhymed!) sprinkled with mini holo sea green hexs' and light blue holo hexs'. The sand meets the sea with an "un-gold" true shimmering sand color- achieved by blending 3 different fine sand colors and a sand colored mini-hex for size interest. I kept it more of a cool-toned, misty day as opposed to a bright sunny day, if that makes sense."


 I think it makes PERFECT sense!!
I mean, look at that freakin' BLING!!  And it is totally the SAND & SEA.  Well, technically, this is the Ocean (Newport Beach, CA to be exact), but whatever!  These are the cool colors of the Pacific, as opposed to the bright aqua's of like the Carribbean, and I LOVE it!  I am totally amazed that she was able to get the color of the beach into a bottle!!  

The other polishes in my mani are Zoya's "Charla" and a water marble fail of a gold & silver Pure Ice polish (I'm too lazy to find the names, and I'm too bitter to care).  I actually painted "Charla" over the other failed water marbles, since I've heard she stains like a beeotch, so hopefully this layering will help avoid that.


Here's another pic in the sun, cuz that's how I roll!

For a little more drama to this story, this is actually the 2nd version of "Sand & Sea".  The first exploded in the mail, and arrived like this:
We think it was due to the heat, since it was like 110 degrees in Arizona, and about that here in Cali during the transit time, and it actually had to bake in my metal mailbox all day until I got home from work.  It was obviously well-wrapped, so it doesn't seem likely that was the culprit.  At any rate, Jenna promptly made a replacement one, which made it home safe & sound (obviously, duh!).

Sorry, it seems like I gush whenever I have something to say about Lacquistry, but I've loved every single polish of hers I've gotten (I'm up to 20).  She's also the one that got me hooked into this nail community; I accidentally stumbled upon "Autumn Flurries" in an Etsy treasury and the rest is history.  Also, Jenna is a true artist who really cares about her craft, and I deeply admire her talent.  Did I mention she's also like the coolest person ever?

Jenna is currently finishing up her custom orders (she's not taking any more at this time), and has announced that she will start stocking her Etsy Shop soon.  Keep an eye on her Facebook Page for updates, and to also check out the other custom polishes she's made for other lucky customers.  I can't wait to get me more Lacquistry!!  


Saturday, June 2, 2012

Black & White Water Marble

So I have seen all of these nail art contests, and I've wanted to enter some, but I was doing the Plasma thing, so I never did. 

But on Thursday, May 31, I saw BerryPolished.com's Black & White Mani contest.  I figured black & white would be easy to do.  The only thing was that the deadline was midnight on the next day, June 1.  So all day long at work, I daydreamed of what I would do.  Black & white glitter?  Nail stripers and dots?  Flowers?  Skulls?  Then it hit me...water marble!!

So what kind of water marble?  This one I had done before immediately came to mind:
Click HERE for the YouTube video I first saw with this technique.


Cool, right?  So, I started at 8:00 pm. And after about 3 hours of nail prep, base coat, white coat, marbling, dotting, then matte top coat, I ended up with this:
Not too shabby!  I may have over-done the dots, but I was having fun! :-)  So, anyway, I barely met the deadline, but got it entered.  Once I had sent my entry, I went ahead and clicked on the photo album to check out the competition's entries.  They're all great, and creative, and I'm glad I didn't look at them before I entered, or I may not have even tried.  But as I go along, what do you think one of the entries was?  Of course, it was a black and white water marble with dots!  What are the freakin' odds?!?

Ours are not exactly the same, of course, but still!!  My heart sunk, and I felt like people would think I had intentionally copied her.  How cheesey does that seem? 

Anyway, I had already entered, so I guess it's up to the judges at this point!  So from now on, I'll be checking the entries ahead of time the next time I enter a contest...I just hope I don't psyche myself out doing it! ;-)

UPDATE:  I won 2nd place!!  Wooo hooo!  :-D

Thursday, May 24, 2012

A Mani Worthy of Lacquistry "Oh, Yes I Did!"

So, of course, as soon as I get the chance, I wanted to bust out my Lacquistry!  I hadn't yet worn my "Oh, Yes I Did!", so it seemed like the perfect choice.  It's a lovely BROWN glitter with larger holo hexes that glint turquoise and green in the light.  It's absolutely stunning!

I wanted polish job which would do this gorgeous glitter justice, so I figured a water marble would be just the thing.  Here's my first try:

Hmmm.  Close, but no cigar.  The blue is China Glaze "First Mate" and is too....blue.  It doesn't pick up the aqua-ish glitter in the OYID.  So, I took it off.  Yup, I removed my hard-earned water marble, and decided to go darker & use a blue that matched better:


SCORE!!!  I used China Glaze "Shower Together", Ulta "Chocolate" and OPI "Studs & Stilettos".  I think it's gorgeous, and perfectly matches OYID.  I love it! 

I've had this mani on for going on 5 days now, and I never get tired of admiring it ;-)  But it's growing out, so I need to think of my next creation....